How to correctly install a fitting with EXPANDO T
 So that you can implement even thin fronts quickly and easily, our fittings are now available with a new fixing system: EXPANDO T. You can implement three applications using this system: lift systems, doors and pull-outs. There is also a wide range of materials available – from chipboard through to ceramic fronts. This gives you even more design freedom when designing your furniture. We would be happy to show you how to correctly install EXPANDO T.
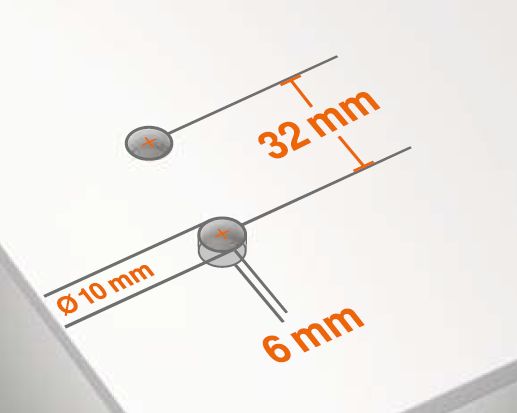
The first step is to prepare the front to be installed. To do so, bore holes with a diameter of 10 mm and a minimum depth of 6 mm. The number of drill holes differs depending on the fitting. An example of how this looks for the CLIP top BLUMOTION hinge for thin doors is shown below:
The next step is to place the fitting in the drill holes and then fully tighten the screws. We recommend minimum torque requirements for the following materials:

The following rule of thumb applies: the harder the material, the tighter the screw connection will need to be. But do not worry, the fixing system does not damage easily. Nonetheless, it is advisable to play it safe by carrying out checks during the first few assemblies using a standard torque screwdriver. We generally recommend a trial application to test the new fixing system in combination with the material.
Limitation of liability:
We accept no liability for the use of EXPANDO T in combination with materials not listed or fittings from other manufacturers. We recommend that the assembly be carried out by an experienced furniture manufacturer/fitter.